
Prior to WordPress 3.0, Multisite was called WordPress MU (or multi-user) and was a separate software package that needed to be downloaded and installed. WordPress 3.0 merged MU into the core of WordPress.
Multisite is not enabled by default, so it’s important to understand the differences before enabling Multisite in your WordPress installation.
A site is a single site inside the network. Therefore, WordPress Multisite is a network of sites.
Another important term is Blog ID. The Blog ID is a unique ID assigned to every new site created in Multisite. Many of the functions and code examples will reference the Blog ID.
When you install standard WordPress, you are installing a single website to run on WordPress. WordPress Multisite enables you to run an unlimited number of websites with a single install of WordPress. When enabling Multisite, you need to determine how sites will be viewed in WordPress, either using subdomains or subdirectories. The following is an example of both:
Subdirectory Example
➤ http://example.com/site1
➤ http://example.com/site2
Subdomain Example
➤ http://site1.example.com/
➤ http://site2.example.com/
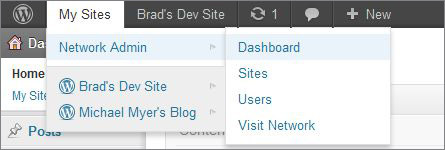
Themes and plugins are also treated differently in Multisite. Individual site administrators can enable themes and plugins on their site, but they can’t install them. WordPress Multisite also introduces a new user role: Super Admin. Super Admin users have access to the Network Admin section of Multisite. This section is where all Multisite configuration occurs. Super Admins also have full access to every site in the Multisite network, whereas normal Administrators only have access to the site they are an administrator of.
Enabling Multisite
Enabling the Multisite feature of WordPress is a pretty straightforward process. The first step is to add the following line of code to your wp-config.php file:
define( 'WP_ALLOW_MULTISITE', true );
This line of code should be added just above the comment that reads:
/* That's all, stop editing! Happy blogging. */.
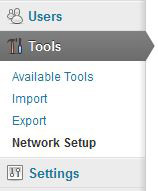
Save your wp-config.php file and upload to your server. Now log in to the admin dashboard of WordPress and you’ll notice a new submenu item for Tools ➪ Network Setup.
The final step to enabling Multisite it’s a series Network Setup of manual changes you need to make to WordPress. The first step is to create a blogs.dir directory in your /wp-content directory. This new directory will store all media uploaded throughout your Multisite network. All media in Multisite is uploaded to wp-content/blogs.dir/BLOG_ID/files/YEAR/MONTH. Permalinks for media files look like this: http://example.com/files/2013/10/Halloween.png.
The next step is to add some code to your wp-config.php file. This code defines the base settings for Multisite, and will vary depending on your setup. The following is a code example for a Subdirectory install of Multisite under the example.com domain.
define( 'MULTISITE', true );
define( 'SUBDOMAIN_INSTALL', false );
$base = '/';
define( 'DOMAIN_CURRENT_SITE', 'example.com' );
define( 'PATH_CURRENT_SITE', '/' );
define( 'SITE_ID_CURRENT_SITE', 1 );
define( 'BLOG_ID_CURRENT_SITE', 1 );
The final step is to replace your .htaccess file rules with the new rules provided:
RewriteEngine On
RewriteBase /
RewriteRule ^index\.php$ - [L]

# uploaded files
RewriteRule ^([_0-9a-zA-Z-]+/)?files/(.+) wp-includes/ms-files.php?file=$2 [L]

# add a trailing slash to /wp-admin
RewriteRule ^([_0-9a-zA-Z-]+/)?wp-admin$ $1wp-admin/ [R=301,L]
RewriteCond %{REQUEST_FILENAME} -f [OR]
RewriteCond %{REQUEST_FILENAME} -d
RewriteRule ^ - [L]
RewriteRule ^[_0-9a-zA-Z-]+/(wp-(content|admin|includes).*) $1 [L]
RewriteRule ^[_0-9a-zA-Z-]+/(.*\.php)$ $1 [L]
RewriteRule . index.php [L]
These rules may differ depending on your Multisite setup, so make sure you copy the code provided in the Network Setup screen when enabling Multisite in WordPress. After making the required changes, you will be required to log back in to WordPress.
Advantages of Multisite
WordPress Multisite has a number of advantages over standard WordPress. One big advantage of Multisite is that you have a single install of WordPress to administer. This makes updates for WordPress, themes, and plugins much easier. If you have a WordPress Multisite network of 20 sites, and a plugin update is released, you need to update that plugin only once and it will affect all sites in your network. If each of the 20 sites were a separate install of WordPress, you would have to update that plugin 20 separate times. Aggregating content is also another big advantage. It is very easy to share content between your sites in a Multisite network. For example, if you have 20 sites in your network, you could easily aggregate posts from every site to your main blog to showcase your network of sites and content. The biggest advantage to using Multisite is the speed in which you can launch new sites. These sites can share themes, plugins, and even users.