

The Unix operating system (and likewise, GNU/Linux) differs from other computing environments in that it is not only a multitasking system but it is also a multi-user system as well.
It means that more than one user can be operating the computer at the same time. For example, if your computer is attached to a network, or the Internet, remote users can log in via telnet or ssh (secure shell) and operate the computer. In fact, remote users can execute X applications and have the graphical output displayed on a remote computer. The X Windows system supports this.
GNU/Linux uses the same permissions scheme as Unix. Each file and directory on your system is assigned access rights for the owner of the file, the members of a group of related users, and everybody else. Rights can be assigned to read a file, to write a file, and to execute a file (i.e., run the file as a program or see contents of a directory).
Basic File Permissions
Permission Groups
Each file and directory has three user based permission groups:
- owner – The Owner permissions apply only the owner of the file or directory, they will not impact the actions of other users.
- group – The Group permissions apply only to the group that has been assigned to the file or directory, they will not effect the actions of other users.
- all users – The All Users permissions apply to all other users on the system, this is the permission group that you want to watch the most.
Permission Types
Each file or directory has three basic permission types:
- read – The Read permission refers to a user’s capability to read the contents of the file.
- write – The Write permissions refer to a user’s capability to write or modify a file or directory.
- execute – The Execute permission affects a user’s capability to execute a file or view the contents of a directory.
To see the permission settings for a file, we can use the ls command as follows:
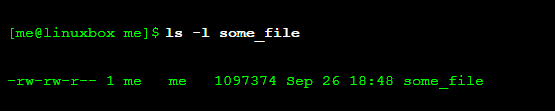
We can determine a lot from examining the results of this command:
- The file “some_file” is owned by user “me”
- User “me” has the right to read and write this file
- The file is owned by the group “me”
- Members of the group “me” can also read and write this file
- Everybody else can read this file
Let’s try another example. We will look at the bash program which is located in the /bin directory:

Here we can see:
- The file “/bin/bash” is owned by user “root”
- The superuser has the right to read, write, and execute this file
- The file is owned by the group “root”
- Members of the group “root” can also read and execute this file
- Everybody else can read and execute this file
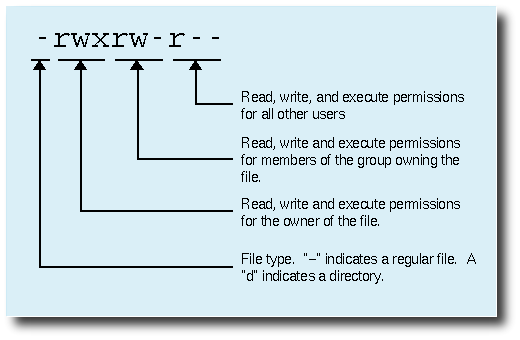
In the diagram below, we see how the first portion of the listing is interpreted. It consists of a character indicating the file type, followed by three sets of three characters that convey the reading, writing and execution permission for the owner, group, and everybody else.
Using Binary References
Permissions can also be represented by numbers witch are a binary representation of the rwx string.
r = 4
w = 2
x = 1
7 = 4+2+1 (read/write/execute)
6 = 4+2 (read/write)
5 = 4+1 (read/execute)
4 = 4 (read)
3 = 2+1 (write/execute)
2 = 2 (write)
1 = 1 (execute)
Changing file or directory permissions
chmod
The chmod command is used to change the permissions of a file or directory. To use it, you specify the desired permission settings and the file or files that you wish to modify.
Therefore, when setting permissions on a file, you will want to assign all three levels of permissions, and not just one user.
Think of the chmod command actually having the following syntax…
Sintax: chmod owner group world FileName
Examples:
chmod 666 mydoc.txt – read/write by anybody! (the devil loves this one!)
chmod 755 mydoc.txt – rwx for owner, rx for group and rx for the world
chmod -R 777 mydirectory – read, write, execute for all and propagate recursively to all files and subdirectories (-R option)! (may not be the best plan in the world…)
(ps, never set things to 777 unless you have a really good reason to do so.)
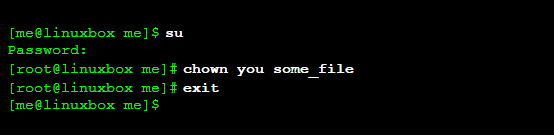
Becoming the superuser for a short while
It is often useful to become the superuser to perform important system administration tasks. A program called su (short for substitute user) and can be used in those cases when you need to be the superuser for a small number of tasks. To become the superuser, simply type the su command. You will be prompted for the superuser’s (root) password:

After executing the su command, you have a new shell session as the superuser. To exit the superuser session, type exit and you will return to your previous session.
Changing file ownership
chown
You can change the owner of a file by using the chown command.
Notice that in order to change the owner of a file, you must be the superuser.
If I wanted to change the owner of some_file from “me” to “you”, I could:
Changing group ownership
chgrp
The group ownership of a file or directory may be changed with chgrp command.

In the example above, we changed the group ownership of some_file from its previous group to “new_group“.
You must be the owner of the file or directory to perform a chgrp.